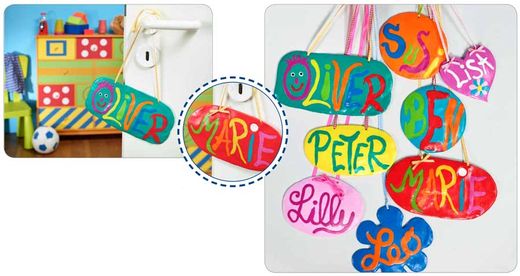
FIMO kids door signs for children‘s rooms
A door sign tells you right away who a room belongs to!
Instructions:
1 The size of the FIMO kids door sign depends on the number of letters that are going to be on it – in other words the length of the child's name. If the name is very long, a short form or nickname could be used as an alternative. For one door sign you need two packs of FIMO kids modelling clay in the background colour of your choice; three packs of modelling clay are required for a large door sign.
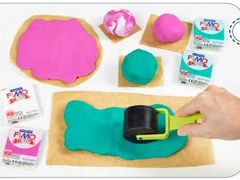
The piece of baking paper you use has to be large enough to work on. This keeps the work surface clean and means the door sign can be left on the same piece of baking paper when placed in the oven for hardening afterwards. Knead together two or three packs of FIMO kids modelling clay as required. Use your hands to then roll the modelling clay to a big ball. To blend a new shade, knead different colours of modelling clay together – e.g. mix glitter white with rose to create glitter rose.
2 Vary the amount of the second colour you add according to your taste. Here, we blended one pack of glitter white with one pack of rose. Flatten the ball a little with your hand and then use the roller from the FIMO kids work&play set to roll it out to an approx. 2-3 mm thick
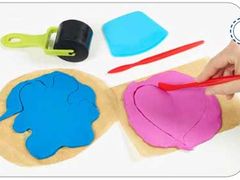
sheet. Whilst rolling over the sheet of FIMO kids, form it into an oval, round or other shape of your choice. Door signs in the shape of, e.g., a blob or a heart look nice too: Let your imagination run wild and use the sharp modelling stick to make an outline of any motif you like in the sheet of FIMO kids; then cut it out with the flat-ended modelling stick. Remove any excess modelling clay.
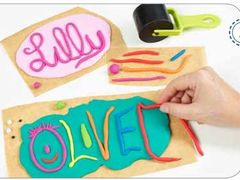
3 It's then time to ‚write' the letters of the name using FIMO kids modelling clay. What kind of letters do you want? You could go for capitals or small letters, print or joined-up writing, ornate or graffiti-looking characters or, indeed, any other type you like. To make a letter out of FIMO kids modelling clay, use your hand to roll the desired colour to a thin long or short ‚sausage' (depending on the letter). Place the sausage on the door sign, shape it into the letter required and press on lightly. If the sausage is too short, simply add more rolled bits to it. Cut off any surplus material. To make a dot for i or j make another small ball of FIMO
kids and press on. It also looks good when you use the letters to make pictures, e.g., an ‚O' with a face in it. For the eyes, hair, nose and mouth, make small sausages or balls as required and press on. You can add a decorative FIMO kids flower using a tiny ball in the middle and short, flattened bits of sausage for the petals around the outside.
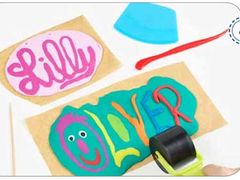
4 Next, roll over the sign using the roller. Go over the letters rolling from top to bottom or bottom to top. As if by magic the FIMO kids letters and motifs merge with the sheet of FIMO kids to form a smooth surface. Finish off by going around the outside of the oval, round or straight door sign using the cutting tool or flat-ended modelling stick to push or cut into shape. Make one or two holes in the top of the door sign with the sharp-pointed modelling stick so you can hang it up later on.
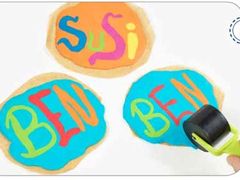
5 If you like, you can use this ‚magic trick' to make changes to the FIMO kids letters.
By rolling from top to bottom with the FIMO kids roller, you make the letters longer; rolling from side to side means they become wider.
If you roll over the letters lengthwise as well as crosswise, they become both longer and wider. Then finish off the edges as described in step 4 and make the holes for hanging up.
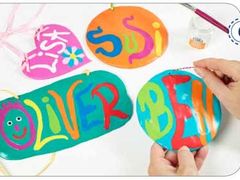
6 Leaving the door sign on the baking paper, harden in the pre-heated oven for approx. 30 min at 110°C. Allow to cool, remove the baking paper and varnish the door sign. Leave to dry.
Thread a piece of ribbon or cord through the hole(s). You can also stick on decorative bows if you like. The FIMO kids door sign is now ready for hanging up!
Tip: ABC modelling fun
Instead of making a whole door sign, you could form individual letters out of FIMO kids and then use them to write names or other words. Make the letters as described above but this time place them directly onto the baking paper, go over them with the roller, harden and then varnish. Any dots need to be attached to their respective letter. Once finished, you can stick the letters onto a surface using double-sided sticky tape. Handwriting-styled FIMO kids names can be made by joining individual letters together to form a single word and then hung up on a piece ribbon too.
Photo and text: Staedtler Gmbh