Terracotta hens in a trendy design
For a romantic country-cottage feeling.
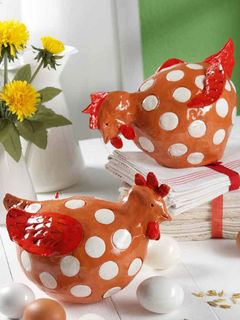 With these decorative
terracotta-looking hens, you can add a rustic touch to your home.
With these decorative
terracotta-looking hens, you can add a rustic touch to your home.
The trendy polka-dot pattern gives these feathered birds a really stylish look too.
Thanks to FIMOair basic, these hens are really easy to make – no oven required.
The ready-to-use, clay-like modelling material simply dries in the air.
A final coat of FIMO Accessoires gloss varnish creates a perfect glazed ceramic appearance.
Instructions:
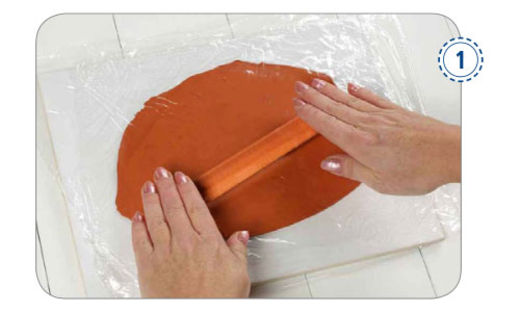
1 Get a bowl of water for wetting your fingers and the modelling tools ready. Cover the work surface with clingfilm. Place about half a block of FIMOair basic in terracotta on the work surface and press it flat. Cover in clingfilm and then roll the FIMOair basic out to an even, approx. 0.5 cm thick sheet using the acrylic roller.
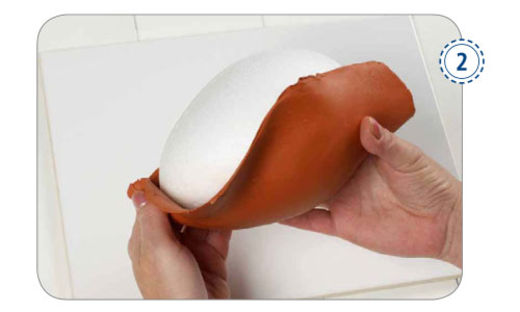
2 Remove the clingfilm and cover the polystyrene egg with the rolled-out modelling clay. Add more sheets until the egg is completely covered. Take care to ensure that the edges join exactly and do not overlap. Press everything on firmly and even it out. Smooth over the joins using a moistened modelling tool or moist fingers. If the hen is to sit, add a little more FIMOair basic to the underneath of the polystyrene egg to give the hen more stability and prevent it from falling over.
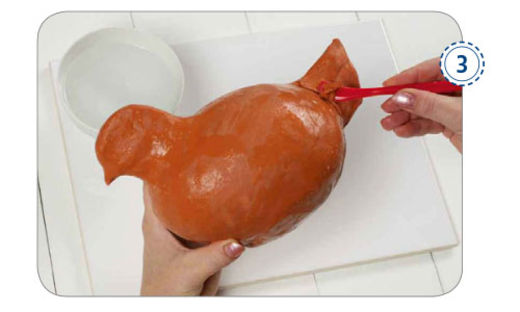
3 For the neck, head and tail take smaller pieces of terracotta-coloured FIMOair basic, position them where required on the polystyrene egg and bring into shape. When attaching pieces, always moisten the area where they are to be added first, add a little extra FIMOair basic and smooth over using a moistened modelling tool. This leaves even, smooth joins. Add the three-spiked comb to the head, the beak to the middle and both chin lobes under the beak and mould to shape.
Unfinished items and left-over bits of material can be stored in
a sealed plastic bag or airtight
container, e.g. a plastic box or jar.
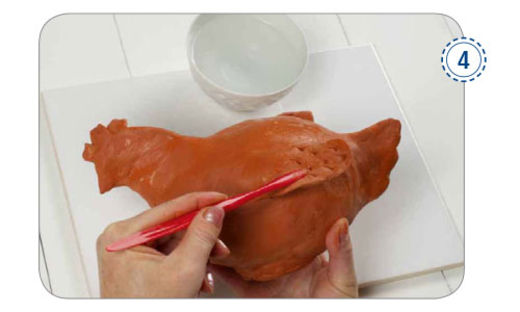
4 Using the modelling tool, make holes for the eyes and a line in the beak. Attach two rolled-out oval pieces of terracotta FIMOair for the wings. Now, using the modelling tool, make a pattern of jagged indents in the wings. Give a rippled finish to the bottom edges of the wings.
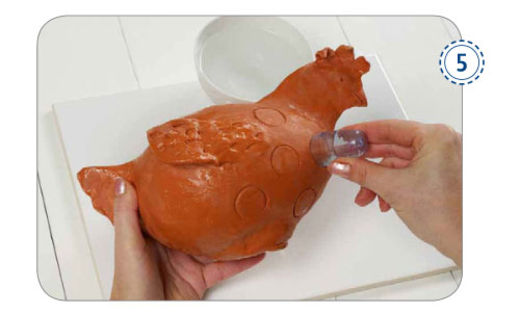
5 Next, take a round cap – e.g. off a
bottle of sweetener - and use it to make circles all over the
body of the hen. Allow the hen to dry out at room temperature for
at least 2-3 days. Should any cracks appear during the drying
process, these can be coated over easily using
fresh clay.
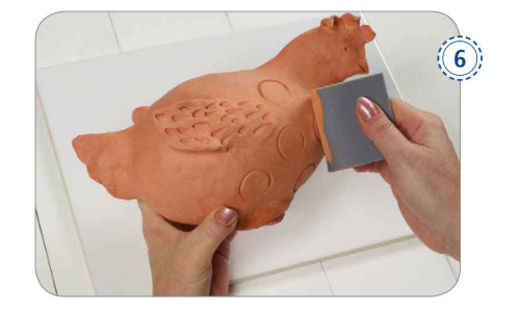
6 Dry sand the hen using the grind'n polish sanding sponges. These sanding sponges are flexible sheets of foam, perfect for use on the curved surface of the hen.
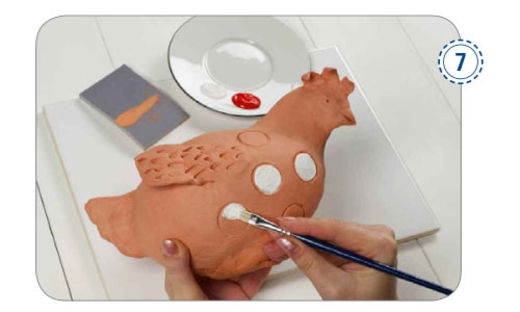
7 Paint the circular indents on the body of the hen using white acrylic paint. Either leave the comb, chin lobes and tail in the original terracotta colour or paint them red. Allow the paint to dry. Then add a coat of gloss varnish to the hen. The varnish gives the terracotta-coloured FIMOair basic a glazed look. It also protects the hen against moisture and dirt.
Ideja, fotke i tekst: Staedtler GmbH